VSFX 752 - 3D Color, Lighting, and Rendering
CG Match-to-Live - Compositing a Digital Object With Its Real Life Double
Project Summary:
Create a digital double for a simple object and composite it into a background plate photo alongside it's real world companion. The focus is on using realistic lighting techniques and render layers to create separate passes and aid in fine tuning during compositing.
Results:
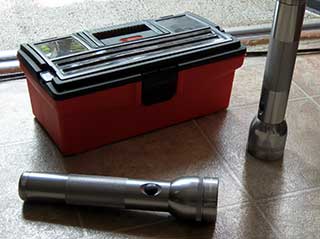
Click on the image to the right to see the final composite. Click here to see a video breakdown of the scene.
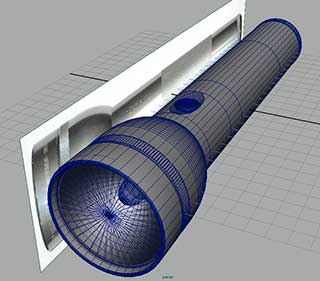 First things first: the model. The object used was meant to be simple but distinctive
so I chose a Maglite flashlight. Though it is made of simple shapes I made the
geometry particularly hi-rez so that all the smooth curves wouldn't facet. Mine
happened to be a brushed chrome which, while I knew would be more complex to
replicate, became a fantastic challenge. Originally I planned to use a bump
map for both the knurling around the handle and hatch marks at either end of
the light. I ended up recessing grooves into the light and modeling the hatch
rings separately but still used a procedural bump for the handle.
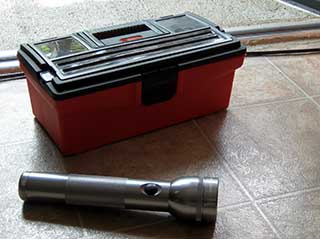 Next up, the background plate. It actually took me several tries to find the right kind of environment
for context and the right kind of lighting to show off the characteristics of the surface. I finally arrived at this
natural light on my front threshold. I found it particularly interesting because it was backlit by the large source
of the sky. Also, a stairway just outside my door baffled the light and split it into two diffuse but distinct directions,
giving me double shadows to work with. I bracketed my shots with 7 exposures to capture the full range of luminance and shadow.
Compounding the situations to replicate was the reflective, shiny floor. What appears to be very dark shadows below the toolbox and flashlight are actually their diffused reflections. This became a very important factor later in compositing because I had to not only create two passes, one for shadow and another for reflection, I had to balance the density of each so that their contributions were correct.
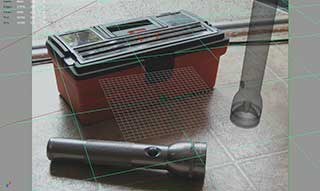 The next step was to match my virtual camera with the real world one; no easy feat. After creating
a matchmove camera in Maya I tweaked the position, rotation, and focal length until the grid lines of the tiles
(a wonderful reference object) matched that of my ground poly. At right you can see the scene in x-ray view looking
thru the camera at its final position. Because I already had the settings for my shaders and bump set, I chose to zoom
the scene way out to match scale rather than shrink the model.
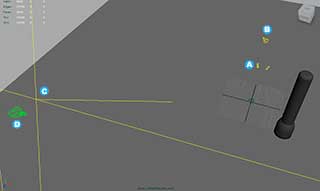 Onwards to the most critical portion of the project: the lighting setup. This deservedly took the longest to create and
fine tune. At the left is the setup in Maya, click to enlarge it.
The main source of light came from two directional lights (A) that differed slightly in angle. One from 30 degrees right of the camera centerand slightly downward, it's intensity set to 3.5. The other close to 30 degrees left of center and an even steeper angle with an intensity of .76. Both were set to a light cyan color to simulate the sky light source. Because of the nature of directional lights position is not important but I moved them into a relative location to help me better visualize their roles.
Above those and swung further around the left side of the flashlight is a spot (B) acting as a rim light for the sharp specular highlights along the top end of the handle. It's intensity was 1.6 and it carried the same light cyan as the directionals. This light affected the diffuse pass but had its shadows turned off because it was meant to accent the specs created by the directionals which weren't strong enough. I focused the light on the top two-thirds of the handle with a soft but tight penumbra to help simulate the light source being blocked from the rest of it by the toolbox.
Thirdly a large, very dim (intensity: .05) area light (C) set just behind the shot camera (D) filled in the front of the Maglite. It's color was a very light beige, replicating the light boucing from the room and floor. Again, this light acted only on the diffuse layer with shadows off.
When it came time to render and composite I slowly worked through splitting out passes into render layers to help with fine tuning the various details. Some were created with Maya presets for a specific pass but a few, including Diffuse and Specular, had to be recreated.
 Originally, highlights continued all the way around the flanges and seams on
the flashlight because the presets turn off shadows for the layer. This ended
up creating lit areas on the backside of the flashlight that should have fallen
in shadow. To correct this for the diffuse layer I created a new Lambert shader
for the Maglite with the same surface color but no reflectivity or specularity.
For the spec layer it was a similar but opposite fix, the shader carried specularity
info but with the diffuse turned to black. Both layers had light shadows on
to block light from the backside. (It should be noted that numerous tweaks to lights
and surface shaders took place between the before and after images on the right so they
are not exact comparisons.)
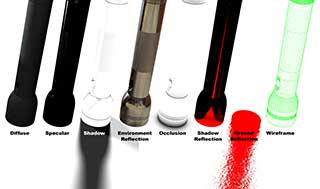
Render Layers:
• Diffuse - Surface and light color on the object.• Specular - Highlight shape and color.
• Shadow - Shadow shape cast by object.
• Occlusion - Shadow shape caused by proximity of surfaces blocking/bouncing light between them. Creates contact shadows. Uses a specific surface shader applied by the render layer preset.
• Environment Reflection - Reflections on the object of the surrounding environment; disregards surface color and speculars. Uses a "mirror" shader: a Blinn with diffuse and eccentricity set to 0, color and spec color set to white, and specular roll-off and reflectivity set to 1.
• Shadow Reflection - Reflections on the object of the shadows it casts on the ground surface. Uses the same mirror shader as environmental reflection but with primary visibilty turned off on the floor and with the lights' color set to black and shadow color set to red.
• Ground Reflection - Reflection of object on ground surface. Ground plane on this layer has a bump attached so that reflection wavers with texture of real floor.
• Wireframe - Wireframe of geometry, used for breakdown video.
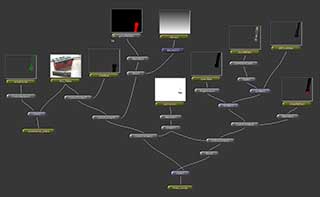 Compositing the layers in Shake involved using specific channels of the renders
to build the result. The diffuse channel over the background plate acts as the
base. The specular and environmental reflection passes were screened on top.
The shadow, occlusion, and ground reflection layers act as masks for separate
color correction nodes that darken the floor and flashlight; giving fine tune
control over all three areas. The shadow reflection layer acts in the same way
on the flashlight. The reflection passes were rendered out in red so that they
held a pure color that could be easily reordered and plugged into the masks.
 And last but not least, the finished plate. Though there are always things that
could be tweaked and fiddled with overall I am extremely happy with the way
this project turned out, particularly because it was my first foray into match-to-live
rendering. At first I was intimidated by the complexity of replicating two reflective
surfaces and multiple light sources but I very much enjoyed the challenge and
learned alot because of it. Click on the image at the
left to see the final video with a breakdown.
